
|
|
Saucer Section Separation (thank you, Jean-Luc) |
Thursday, 29 May 2003 |
| written by Sterling |
Most fulltime RVers, I think, consider it vital that they are able to separate a motor vehicle from their living space. In short, you park the house and then can go driving around, whether to see the sights or for mundane tasks like shopping. Sure, our houses are mobile, but do we really want to take them along every time we dash out for a carton of milk? The two most common solutions to this problem are to either have a trailer as your house (then you can detach your tow vehicle) or to pull a car behind a motorhome (a "towed vehicle", or in the vernacular, "toad"). Each has advantages, well hashed out in RV circles, but both have a key disadvantage in our minds: you spend a lot of your traveling time towing something.
Maybe 90% of the time that's not a problem – if your puller and pullee are well matched, you should hardly know it's back there – but it's the other 10% that bothers us. Sometimes it's the simple expedient of knowing you can realistically back out the same way you drove in, be it a crowded gas station or several miles of narrow, twisting Forest Service "road".
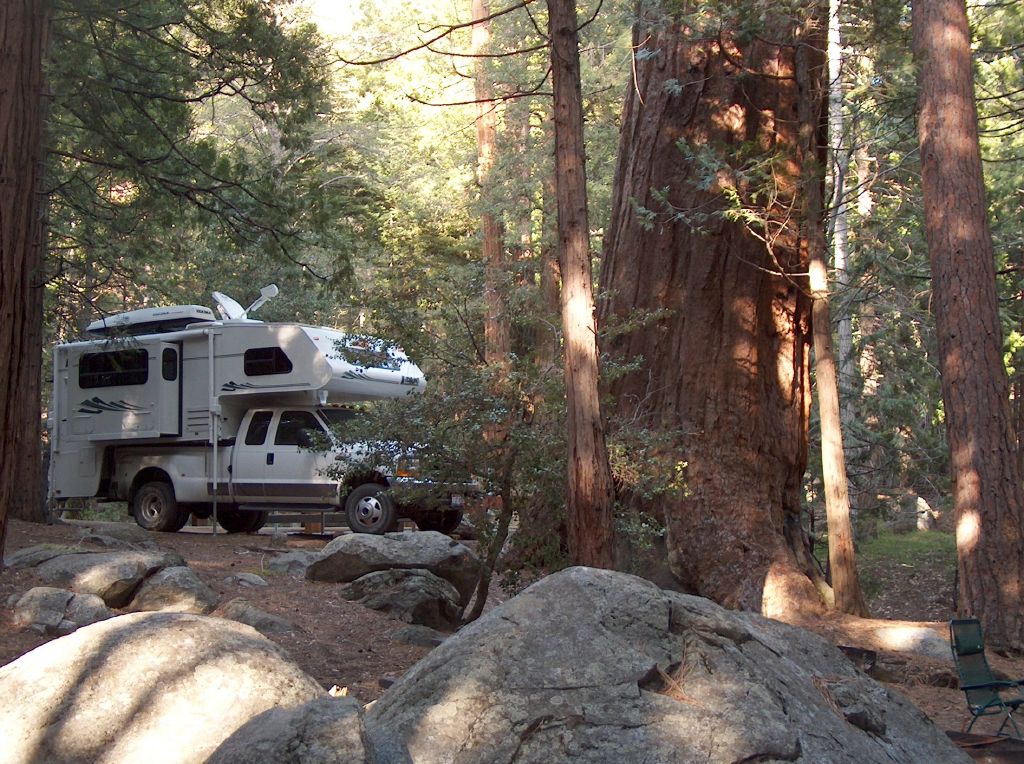 Sometimes it's a place that specifically forbids trailers, like the only campground in the world where you can park your RV right underneath a Giant Sequoia. And sometimes it's just the sheer length, our twenty-four feet versus a minimum of probably forty for a vehicle plus trailer.
It is still an option to forgo detachability, of course. We know fulltimers who have done so, who live on the road in simply a motorhome. There is certainly an argument that detaching is overrated, that if you move frequently you can do your shopping on the way, if you choose a fairly small RV it's not a problem to park at the post office or tour a national park. There are advantages here as well, chiefly that your house is always with you. Ice cream can go straight from the shopping cart into the freezer, and if the mood hits you to eat it on a scenic drive in the Chihuahuan Desert, you can. Our rig is enough of a hassle to detach that we've frequently experienced this benefit. Nonetheless, if you want to park in one spot for awhile, or visit places that your house just can't comfortably go, detaching is really handy.
There are, then, a few different approaches to detachability without trailering. One popular method, favored (in theory) by my brother Eric, is to carry a motorcycle or scooter. This is most often done with a lift on the back of a motorhome, and it's a nice touch to make it an offroad-capable bike to expand your riding options. The next step up is to carry the motorcycle(s) inside, most commonly with a "toy hauler" motorhome. This is basically an RV with a little garage in the back. Finally, the logical extension of this concept is to actually park a small car in the garage. Obviously, these will eat into your living space, and you could well end up with forty feet or more of motorhome+garage – in which case you might as well pull a trailer. Still, it's an option, and it's right for some people.
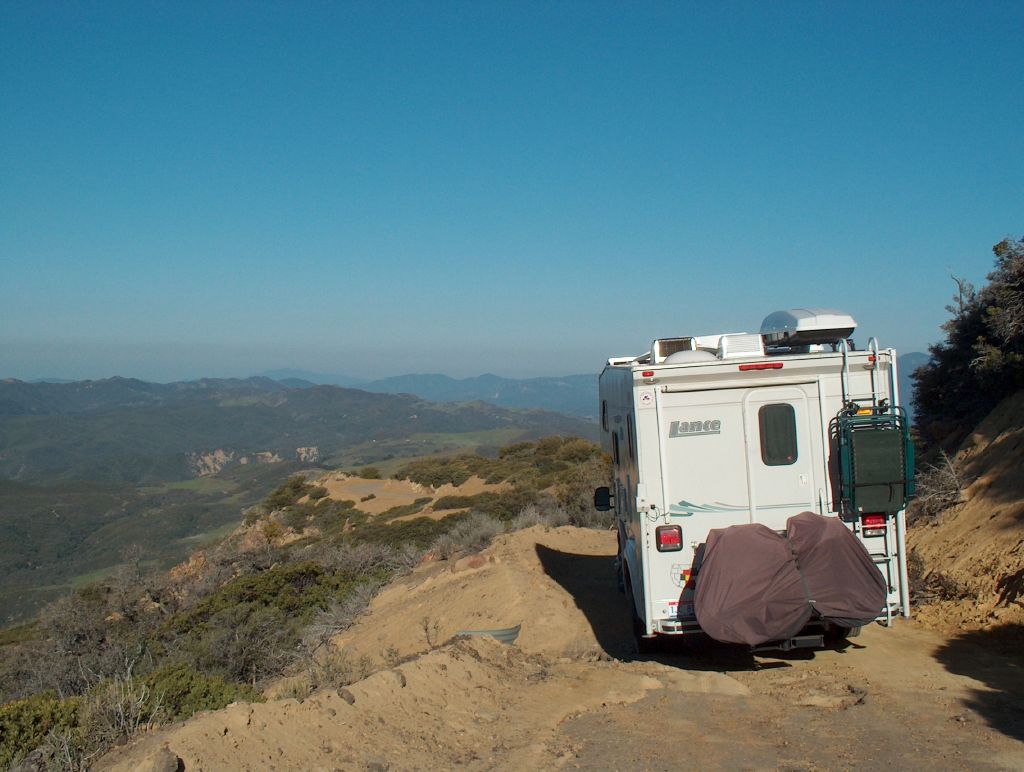
As you probably know by now, however, the option we chose is a truck camper. If you're not familiar with this variety of RV, it's sortof a motorhome in two parts, a little house on a big truck. [OK, you can indeed put a small truck camper on a compact pickup, but anyway…] The house+truck description applies to most motorhomes, in a way, but the key distinction for this article is that we can separate the two. This is probably the major selling point for truck campers; if you already have a pickup, you can turn it into a motorhome of sorts on the weekend, and still use your truck all week for work. We didn't come to it that way, of course – we traded our Subaru for the F-350 specifically so we could live in the camper it would carry. But we get the same benefit of being able to take it apart again, freeing up our four-ton grocery-getter. It seemed to us the best of both worlds.
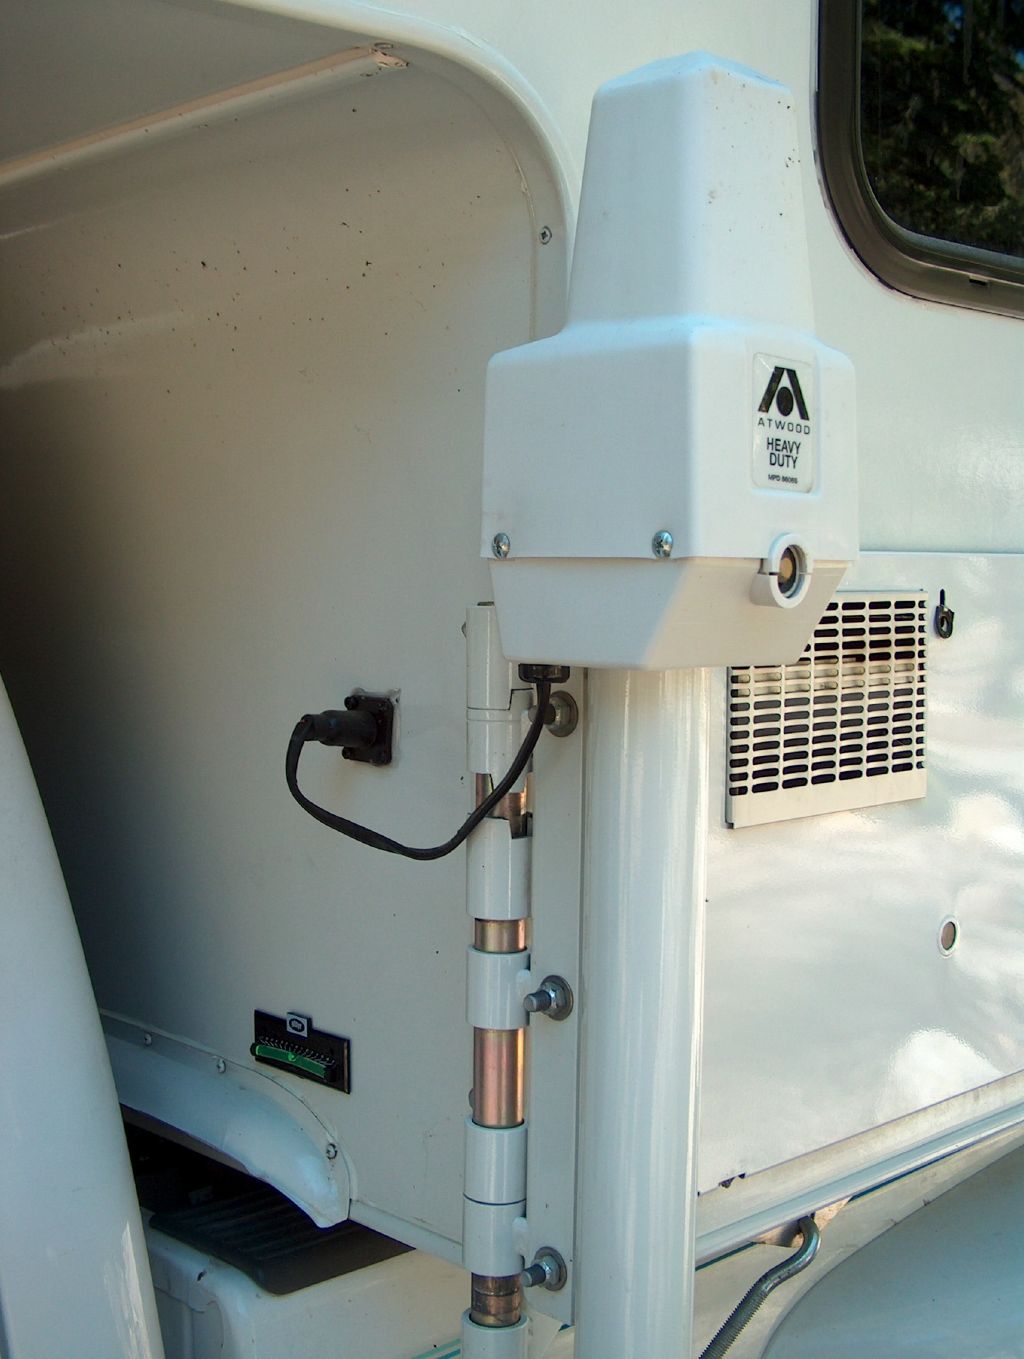
This means that in many ways our camper is more like a trailer without wheels than the living space of a motorhome. It has all its systems onboard, self-contained, and detached from the truck, with consequences like a generator powered by propane – since that's the only fuel the camper carries. So it's perfectly capable of functioning away from the truck, standing on its own four feet. The rest of the time, when our little motorhome is assembled, there are three attach points between the truck and camper: two mechanical, the tiedowns and the cabover struts, and one electrical.
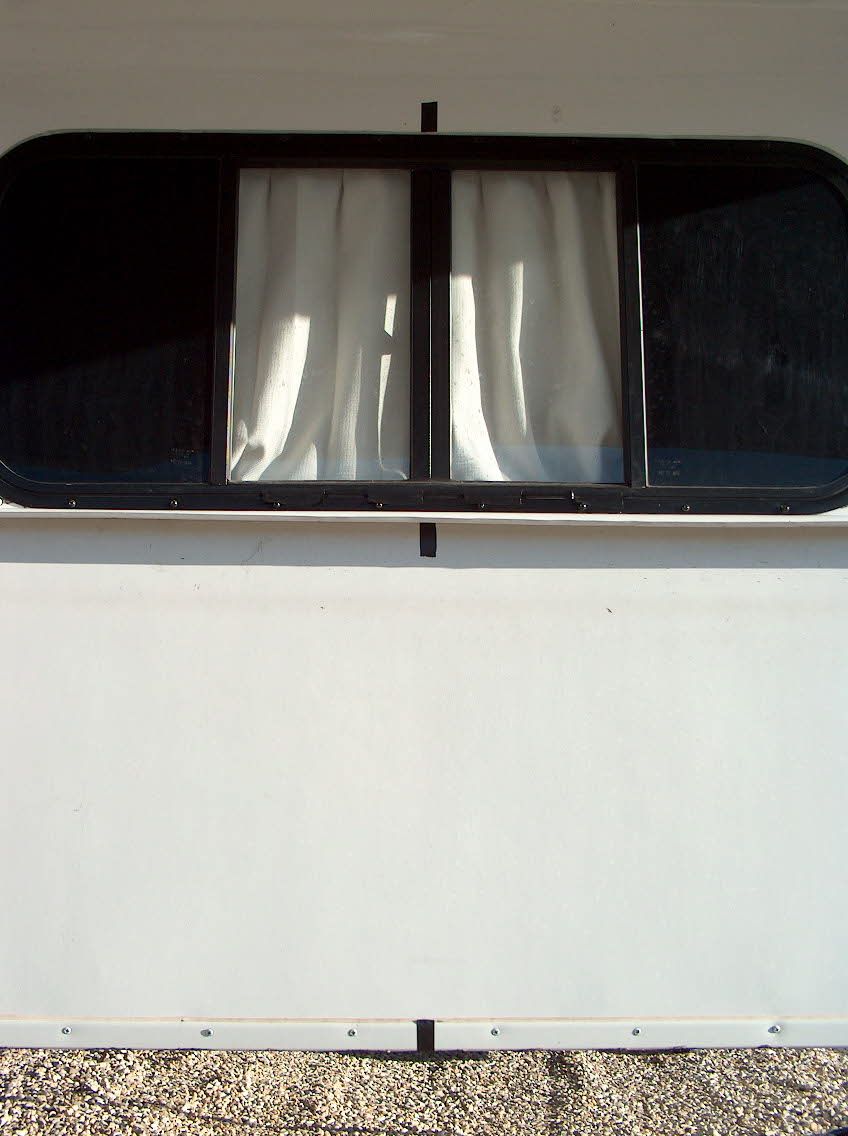
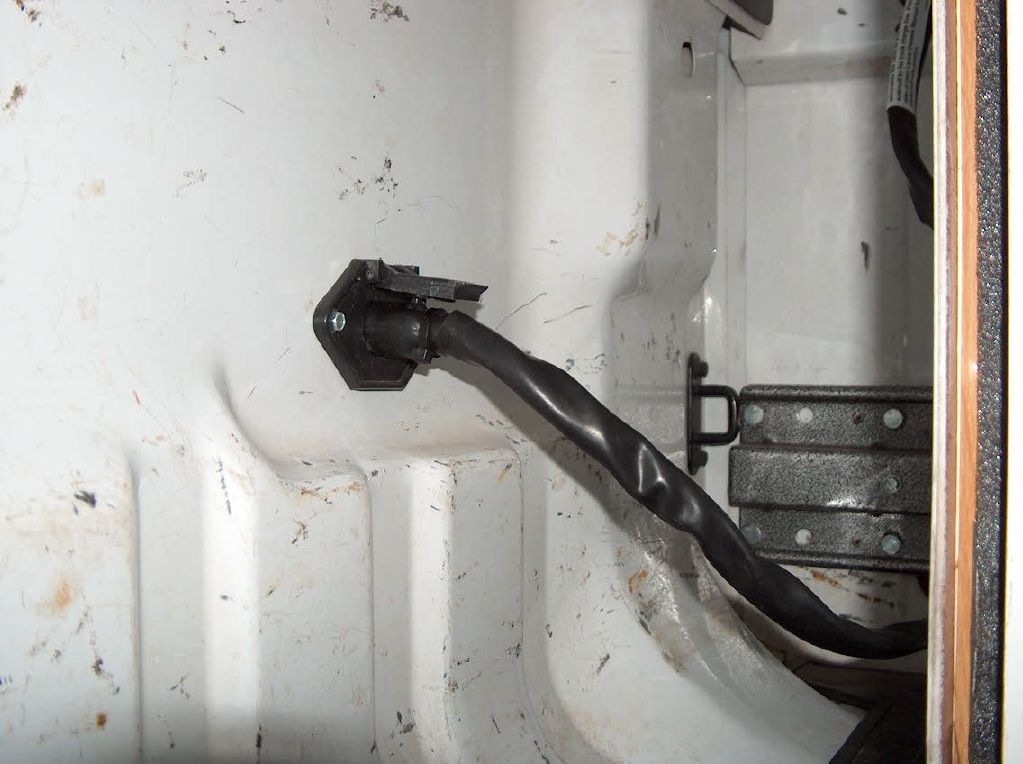 The electrical connection is pretty simple, directly analogous to the plug that goes along with a trailer hitch. Because our camper hangs considerably over the rear of the truck bed, it obscures the truck's own taillights and rear indicators, so these are replicated on the back of the camper. Just like a trailer. The camper also has clearance lights of its own, on the same circuit as the taillights. Finally, there is a wire that charges the camper's battery from the truck's alternator whenever the engine is running, also common on travel trailers. The only real difference with our wiring, often called the umbilical, is that it's tucked out of sight in the truck bed.
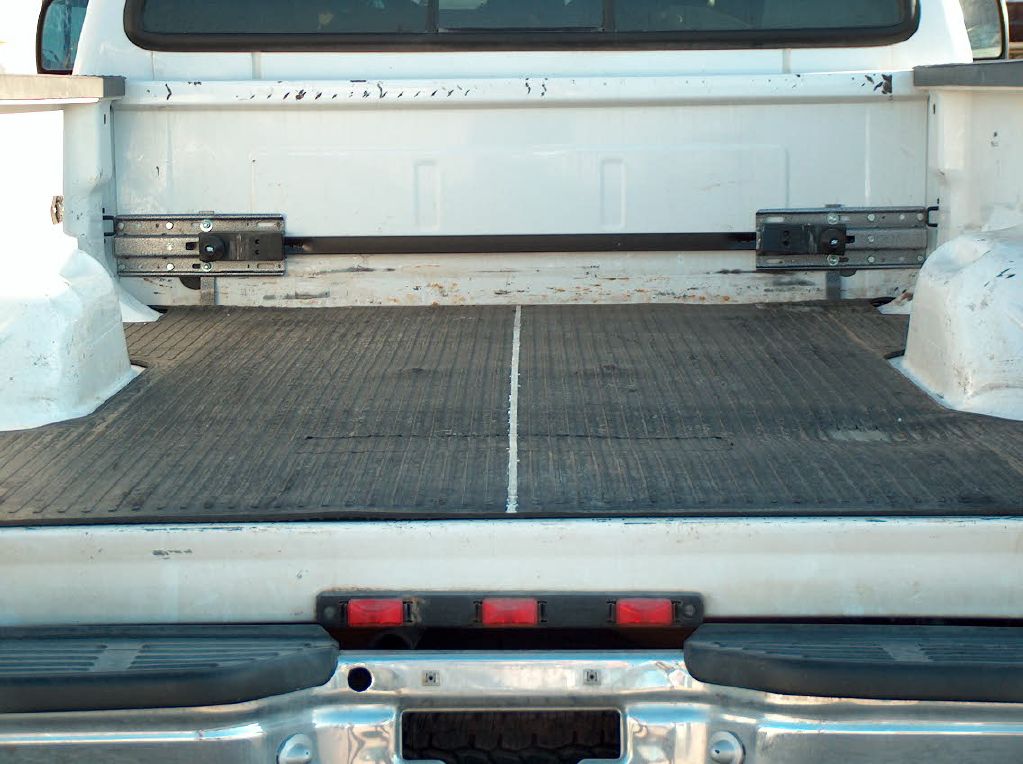
 The first mechanical connection is the tiedown system, in our case the strongest one Happijac makes. It's basically four steel turnbuckles that hook to the camper frame on one end and the truck frame on the other, holding our Lance firmly against the front wall of the pickup bed. They are spring-loaded, so they have a little give to them as the two frames involved flex. And they work pretty well, my biggest complaint being that the rear tiedowns attach only to the Ford's back bumper, which isn't really up to the task. We wouldn't have this problem if we had Torklift tiedowns (the major alternative on the market), but they weren't an option from our Lance dealer, and we didn't have the time last summer to put it together ourselves. I'm not too worried about it since the front tiedowns do most of the work – holding the camper into the front of the truck bed, remember? Also, we'll need a new tiedown system when we upgrade the truck anyway, so we don't feel it makes sense to change now.
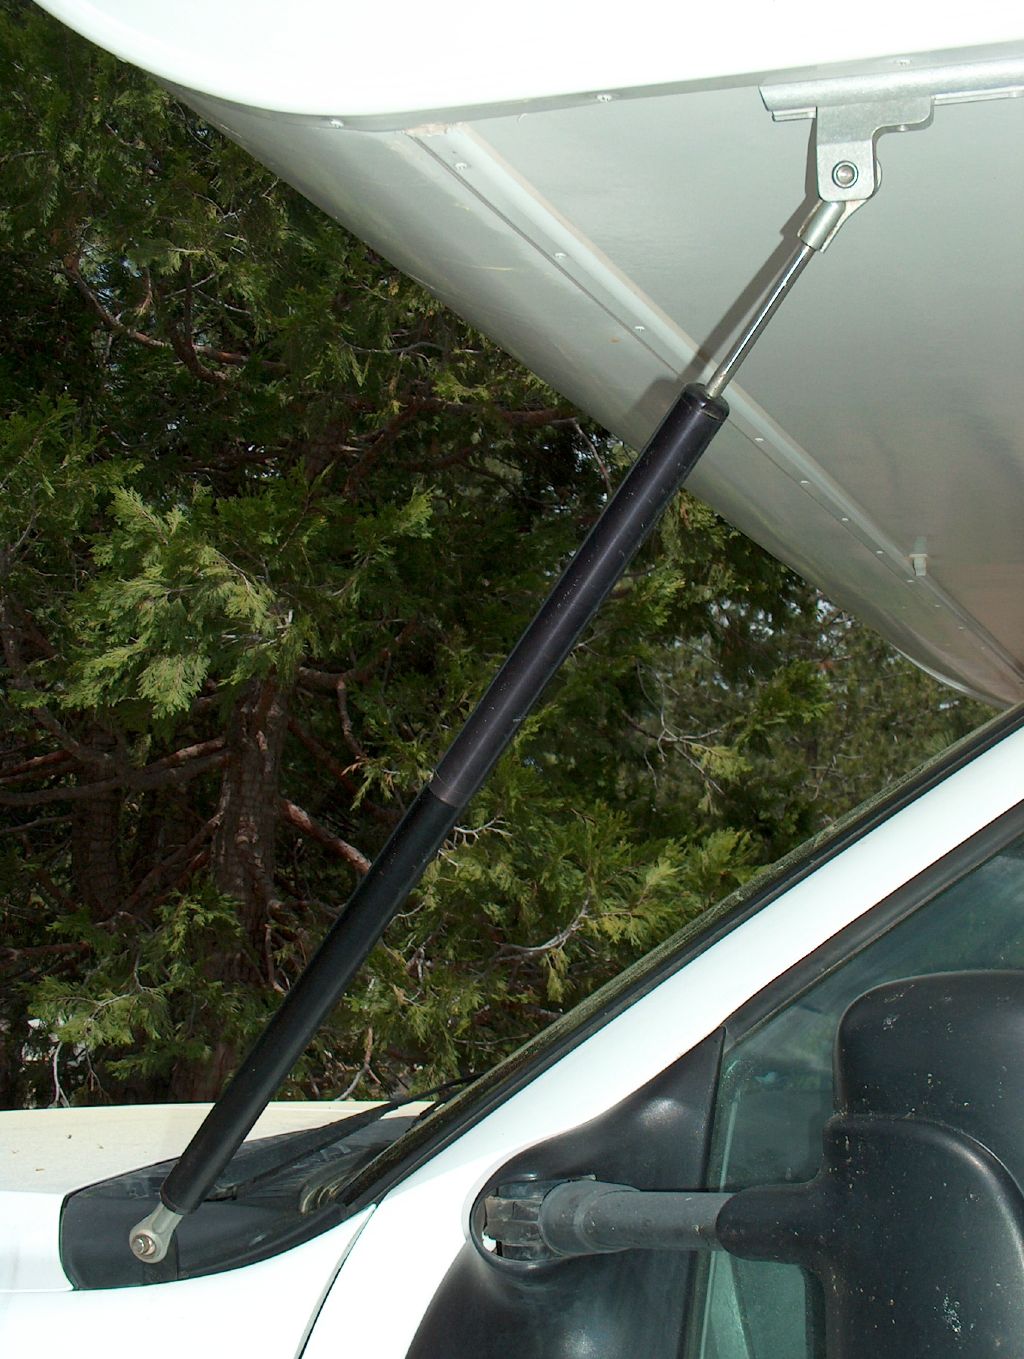 Our final attach point is the cabover struts, basically little shock absorbers between the front ends of camper and truck. They don't support any weight; their job is to dampen relative motion between the camper and the truck's cab. This motion comes from the frame flex I mentioned earlier, plus the fact that the truck's cab is mounted to the frame on rubber bushings. In short, the struts decrease wobble and thus increase our overall stability.
So, now you know more than you probably wanted to about what holds our camper and truck together. What about taking them apart, which is supposed to be the point here? In summary, that process involves undoing the above attachments, removing other accessories that would get in the way, raising the camper off the truck bed (on its extending jacks), and driving the truck out from underneath. That's it in a nutshell, but it's an oversimplification of course. In reality, the process involves about thirty separate steps and takes the two of us about an hour. Don't believe me? Here's a checklist I put together to make sure we don't overlook anything crucial – like moving the license plate from the camper to the truck, which we forgot for three days once in South Dakota. We didn't get busted for it, but I could just imagine: "Well, Officer, our license plate is actually attached to the back wall of our house up there at the State Park…"
Reattaching is essentially the same steps in reverse (here's a checklist for that too), with the added fun of trying to get the truck properly lined up before backing it underneath the camper. This is a challenge faced by all new truck camper owners, and it's harder than you might think. The camper's front legs are very little wider than the truck's dual rear wheels, necessitating quite precise lateral alignment. And if you're not quite straight, the camper won't be snug up against the front wall of the pickup bed, and can shift as you're going down the road. Most disconcerting, because by then you're not thinking about it – some idiot pulls out in front of you, you brake hard, suddenly you hit a bump and there's this loud GRUNCH behind you – anyway, alignment is nontrivial.
We did it by eye the first few times, but this was not entirely satisfactory; it involved a lot of back-and-forth with the truck, "Does that look straight to you?" discussions, and often not getting it quite right anyway. So I developed a system, which I'm happy to share with you. Some of this was from camper loading threads in online forums, and some of it was my own creation. Here it is:
String's Wizzo Camper Alignment Technique
Please read all the instructions before you begin!
| 1. |
 Paint a thin line down the middle of your truck's bed mat (a thick rubber sheet that, in our case, came with the camper), from front to back. If you don't have a mat, it's up to you whether you want to paint on the truck bed itself, or go with a less permanent solution (like a line of tape). Use the tape measure to make sure you get right in the middle.
|
| 2. |
 On the rear window of your pickup, place a strip of transparent tape vertically down the center. Again, measure it to find the exact center.
|
| 3. |
 Apply short pieces of electrical tape to the front wall of your camper, at the middle of the top and bottom edges. Once again, I advise using the tape measure.
|
| 4. |
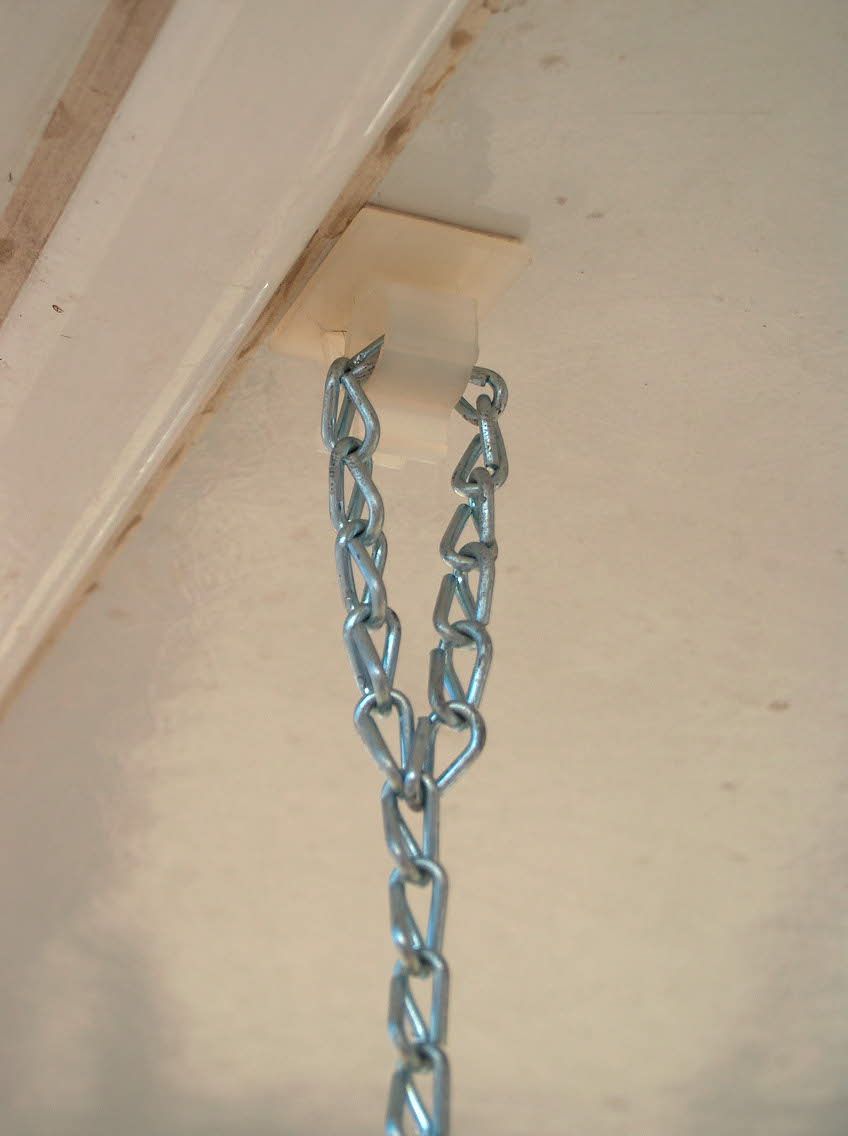 In the center of the front bottom edge of your camper's cabover section, stick on the wire clip. If it's quick-release, you can also put a small loop in one end of the chain now; otherwise, you'll need to open the loop every time you detach the chain from the clip. I don't need to mention the tape measure again, do I?
|
As you've probably worked out by now, this system is based on aligning the centerlines of truck and camper, and all the bits we've stuck on are just visual references to aid this process. The niftiest bit is the lightweight chain hung from the clip under the camper's cabover; chain was recommended to minimize the effects of a breeze. This chain is also the only part of the system you'll remove after you've attached camper to truck; the rest stays in place all the time.
So, once you have the truck generally in position in front of the raised camper, turn around in the driver's seat and look out the back window. By sighting through the transparent tape and along the line down the middle of the bed, you're looking directly down the truck's centerline; you'll know you're aligned correctly in front of the camper when the chain is hanging exactly in front of the electrician's tape marks. It should look something like this:
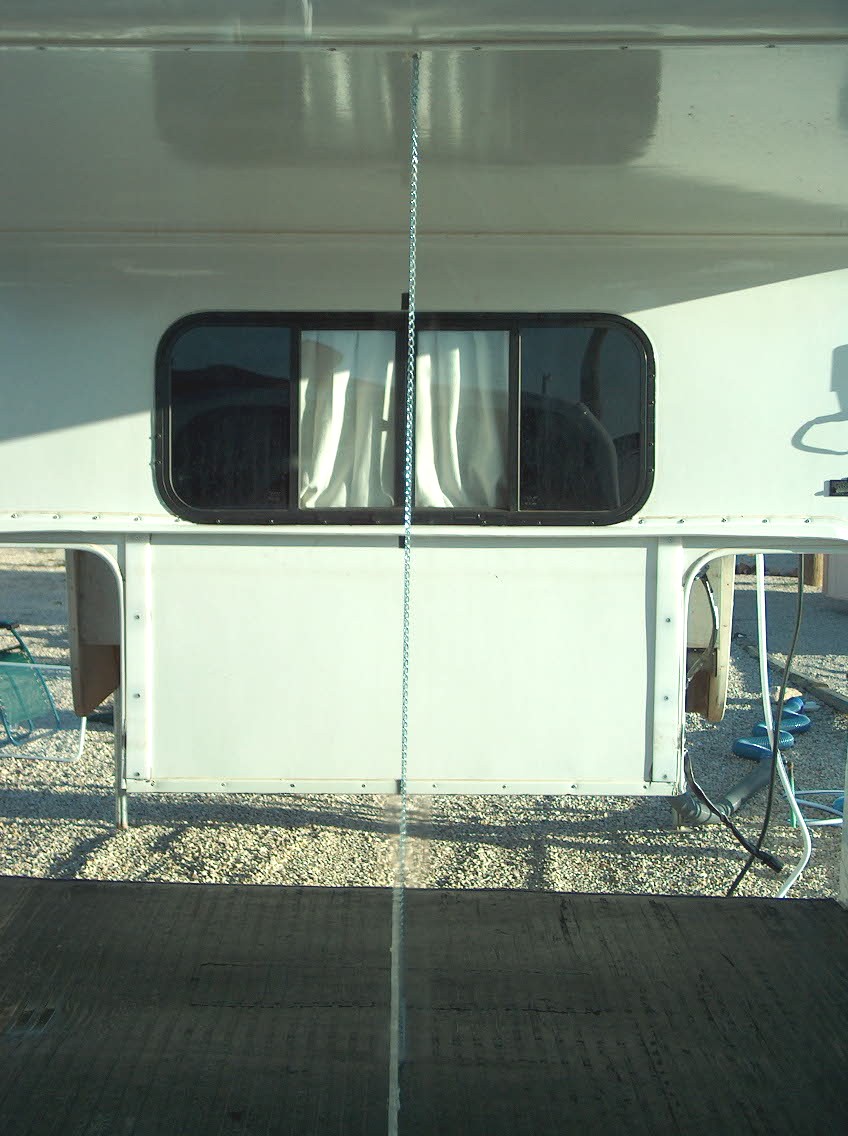
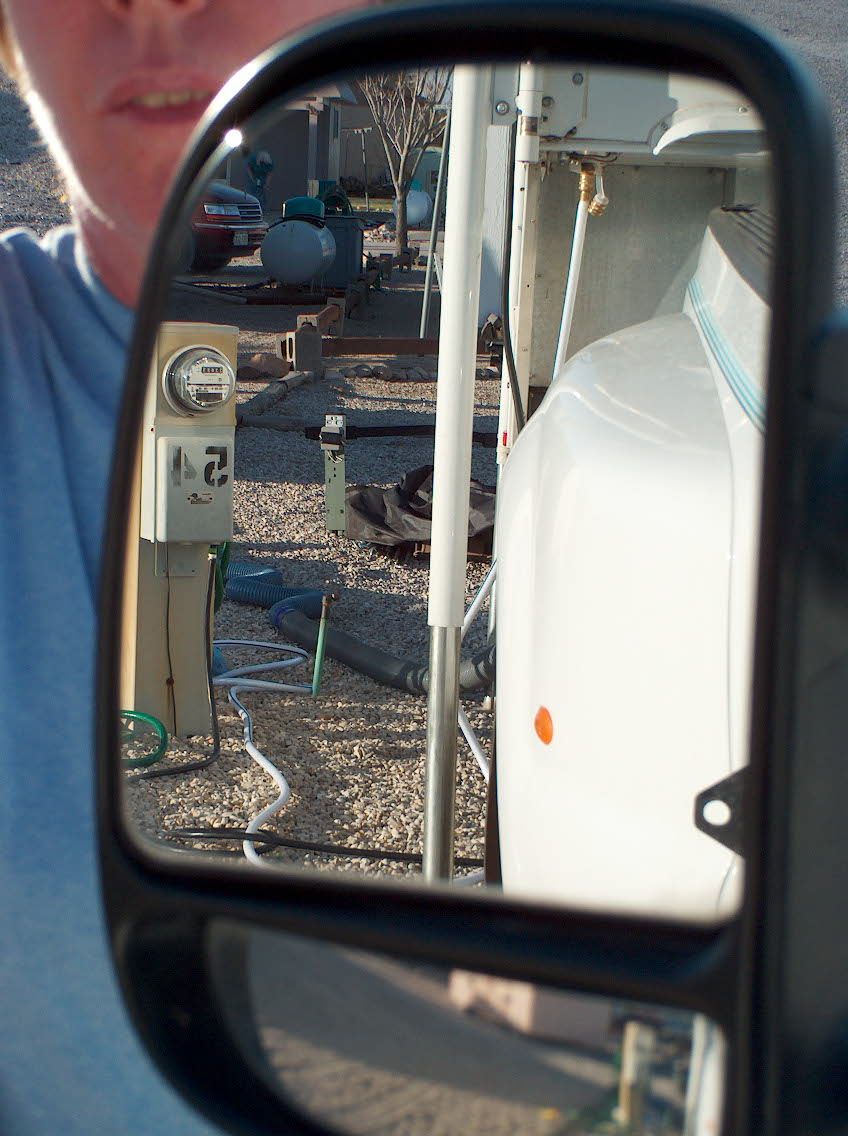
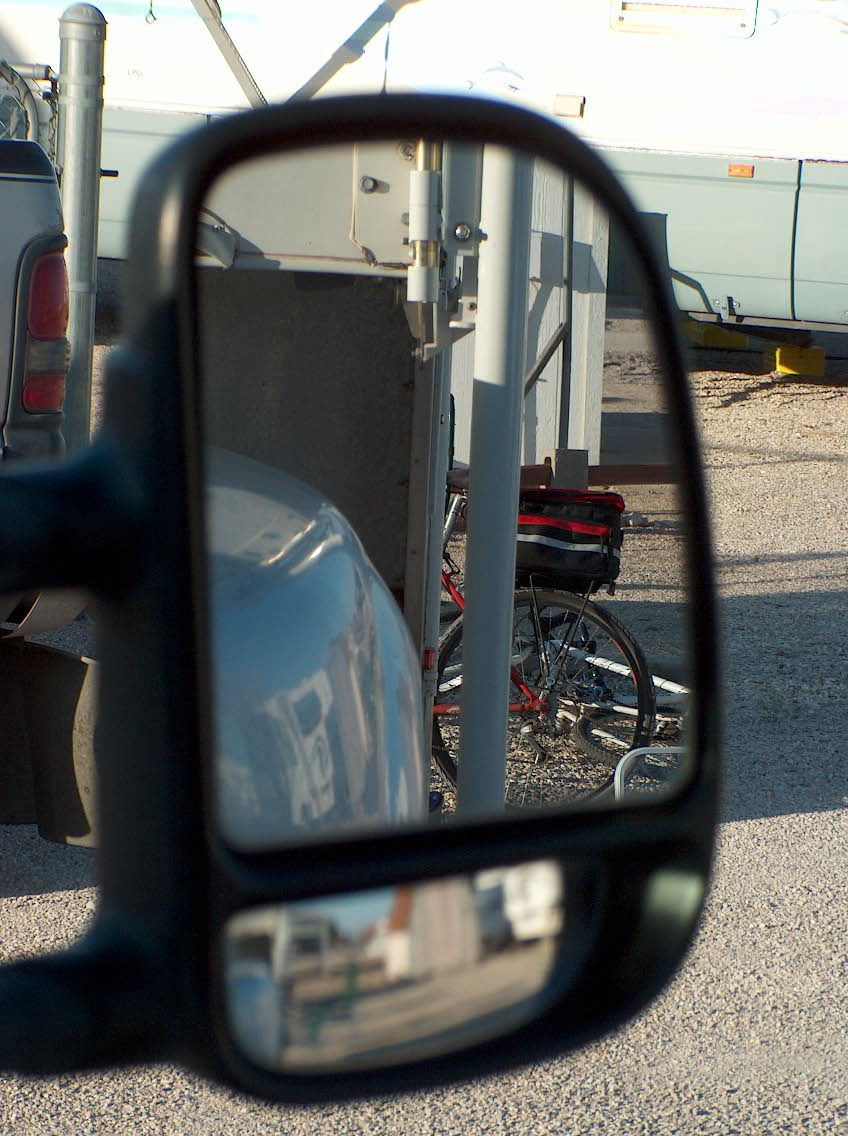
Once you have it all aligned, simply back slowly underneath the camper, keeping the wheels straight. You should see the chain drag right up the white line, followed by the electrician's tape. Just to be sure, you'll probably want to check your mirrors to confirm that the rear wheels are centered between the front jacks:
I am providing this technique purely as an example of what works for me, and I take no responsibility whatsoever if you screw up while using it!
As you've probably gathered by now, truck camper detaching and reattaching is a bit of a pain. We hope it'll get better after our truck upgrade, because we'll have less ancillary stuff to be removed every time, like the bike rack and truck bed storage. But I feel I should mention a few things that could potentially ease the process.
The first is the Stable-Lift system, an integrated jack+tiedown product that would replace both our Atwood legs and Happijac tiedowns. It can be thought of conceptually as jacks with crossbars that, when retracted, come up snug under the truck's frame and hold the camper down. These crossbars also add stability when the camper is off the truck, hence the name. Stable-Lift is well spoken of in the truck camper community, due to this improved stability as well as the added ease of un/loading – you don't have to mess with separate tiedowns. However, we're not sure it's the solution for us, for a number of reasons:
This isn't to say that the Stable-Lift isn't right for some camper owners, just that we don't think it's right for us. The added stability is certainly appealing.
 But I do occasionally have visions of stronger legs for our little house. One easy step would be to replace our rear jacks, standard Atwoods, with their heavy-duty model. This is the jack we have on the front already. Here's my reasoning: The four electric jacks never run at exactly the same speed, meaning that one foot is frequently off the ground when we're raising or lowering the camper. Because the center of mass is much closer to the front jacks, it's always one of the rears that lifts – meaning that, until we get that foot back on the ground, the other rear jack is supporting the weight of the whole back end of the camper. This often results in some unsettling grinding noises as well as a bit of wobble. My thinking is that heavy-duty jacks would be happier, stabler in this situation.
Moving into the pipe-dream category, I could envision replacing all four jacks with something much sturdier… I'm thinking of the sort of hydraulic legs found on cranes and big fire engines. No idea how I'd attach them to the camper or power them, but there you go! In a similar vein, I also have this concept in my head of a fully automated camper/truck alignment system, involving lasers, computers, and an autopilot for the truck. And while we're dreaming, what about replacing the tiedowns with electromagnets in the floor of the camper, energized from the truck's alternator, so that whenever the engine is running the camper is firmly clamped to the truck bed…
Coming back to reality, we have it on good authority that camper loading becomes second nature after the first 900 times or so. As of today, only 889 to go!
Do you know someone who would enjoy this article? Click to e-mail it to them!
| Home | Log | Notes | Maps | Contact | Store |